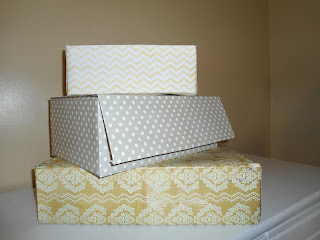
When I was in New York serving an LDS mission, a Sister who taught with me had these amazing beautiful boxes. She stored all her stuff in them and it was super easy for her to stay organized. I asked her where she got them and she looked at me like I was crazy! "I made them!" she said.
All you need to turn your ordinary old boxes and into Stylish organizers, is a box, cute scrapbooking paper, and rubber cement glue.
And whaLA!!!!
Useful tips: While using the rubber cement, you have to douse the paper and the box and the let the glue dry for 2 minutes before bonding.
Thursday, June 20, 2013
{DIY} Mickey Mouse Boy's Shirt
My little nephew just turned 2....time to celebrate! My sister-in-law Brooke (who is the queen of all party throwers)picked a Mickey mouse themed Birthday Party. Um...so cute. He loved it. She had this awesome idea for a lil' old man shirt--Mickey Mouse style. She saw it somewhere online and so we set out to recreate the perfect shirt for the perfect party.
Isn't he theee cutest thing you've ever seen?
Supplies:
1 white shirt
1/8 yard red material
1/8 yard black felt material
Red thread
Black thread
White thread
Polka dot ribbon (mine was 1")
2 Metal or plastic belt holders
Tips:
I didn't need the whole 1/8 yard of fabric but it is nice to have just in case I messed up
Try not to get the shiny ribbon, it is harder to sew
Step 1: Pin ribbon onto shirt and then sew. I stopped 3/4 of the way up the shirt and added a metal belt holder to make it look more like suspenders
Step 2: Fold tie material in half, inside out. Draw your own pattern for the bottom part of the tie, and cut 2cm around it. Then sew all sides down the line except the top part. Cut excess material if needed and turn the tie right side out.
Step 3: Again fold tie material in half, inside out. Draw a half moon, and cut 2cm around it. This is the upper part of the tie. Sew the curved part together, cut excess material, and turn right side out.
Step 4: Cut a number 2 out of black felt, and use fabric glue to paste it on, or if you are feeling super adventurous, you can sew the number 2 on the fabric before you actually sew the tie together (before step 2). Mine was sewn.
Step 5: Undo the seam in the the front of the child's shirt just enough to fit the straight edge of the top of the tie, insert the top of the tie, pin, then sew seam back together.
Final step! If you want to hand sew the whole tie, awesome. I like the tie hanging naturally so it looks like a real one, so I put the bottom of tie under the top and then sewed the top part down.
You are now done.
Feel free to comment and ask questions. It was one of those projects where I wish I had taken more pictures of the creation...oopsie! But I hope you enjoy!
Subscribe to:
Comments (Atom)


